Monday 26 September 2022

Hello Beautiful


Just over 2 weeks to go till I travel down under and catch up with family members and I've just fnished this card is for one of my sisters-in-law.  

A while back I found some rolls of coloured aluminium hidden away on the bottom shelf at a craft shop.  This pink one is a perfect match for the pink highlights in this lovely DP -  I love surprise finds like this!   I cut a track in the background panel to make a path for a spinning butterfly.  The aluminium is rather soft so I cut a second butterfly from cardstock to make it more stable!

At the current As You Like it Challenge, we're asked to use our favourite metallic or glitter and to explain why it's our favourite.  Well I love a bit of glitter, but I have found several glitter card stocks difficult to cut with etched dies.  This aluminium cuts like butter, even if I apply double sided tape to the back of it.

At the current Simon Says Wednesday Challenge, we are challenged to decorate the envelope.  I used this very old rubber mounted butterfly stamp to decorate the envelope.   I also created a notelet for the inside stamped with the same image - it must be lovely to get a pretty envelope in the post!

I would also like to enter the Happy Little Stampers Anything Goes with Dies Challenge for September.

Here's a short video of the butterfly in action


I'm thrilled you stopped by and hope you enjoyed your visit.  If you leave a comment, I’ll know you were here and how to find you and perhaps we can get better acquainted!  

Kate

Sunday 18 September 2022

Carrrots for Candles


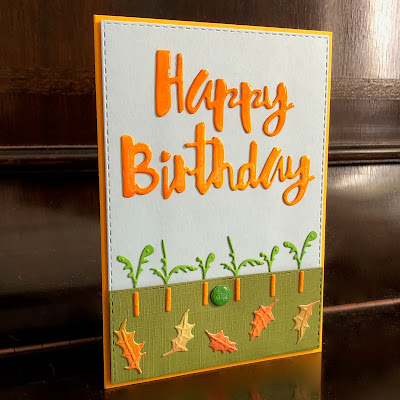
A choir friend had his birthday this week and I made a card for the occasion.  He's a farmer and loves his vegetables and had a funny story to tell about carrots a few weeks ago!  I was going to make him something church or music related but couldn't find the die I wanted!  During my search, I came across this NBUS Gummiapan Carrot die set which I think I bought in late 2019 (or maybe earlier) and had forgotten I had!

What you see on the front of the card is not the carrots in question! To get to the carrots you have to dig - well lift the flap to be precise!  And ta da!


I masked off the bottom of this card panel and coloured it brown then lay the carrots on this.  Folded a small piece of green card stock and slipped the back behind the panel to create this liftable flap.  Behind the front panel is a small magnet and behind the dig button is another to make sure the flap stays closed.  I added his name to the inside of the flap and some candles to the front of the flap.  This morning it was so cold and windy I decided to add some autumn leaves to complete the scene - don't tell anyone but they're actually some holly leaves from Tim Holtz's Winter Foliage which I've been using for Christmas cards! This SSS Happy Birthday sentiment finished off the card!

Challenges:

Four Seasons September Anything Fall Goes - they're celebrating their first anniversary this week!

Seize the Birthday Challenge #247 - Food Glorious Food;

Inspiration Station Challenge #37 - I was inspired by the autumn leaves lying on the green grass


NBUS Challenge #42 - the carrots were NBUS;


I'm thrilled you stopped by and hope you enjoyed your visit.  If you leave a comment, I’ll know you were here and how to find you and perhaps we can get better acquainted!  

Kate

Thursday 15 September 2022

Hey Now, You're a Rockstar


 Get your game on, go play!

I have the honor to be guest designing for the Dream Factory/Traumfabrik challenge this month. Each month we are given a movie title as a prompt to inspire us to create something - and the movie this month is Stardust. 


I haven't seen this movie but it looks interesting and it has a "stellar" cast so it should be good (Robert De Niro, Michelle Pfeiffer, Henry Cavill, David Walliams and Ricky Gervais to name a few).  Here is the Official Trailer  on YouTube.  Of course you don't have to watch the movie or even the trailer!  You might be inspired by the movie title, the movie poster or any of these key words - Witches, fairies, wizards, fantasy, stars and a Halloween theme is also welcome!

My project is based on the key word "Star".  A good friend of mine had his birthday recently and I wanted to make him a guitar based card - he's a brilliant blues guitarist!  I used this unbranded die to create an electric guitar which resembled his guitar as closely as possible.  Using WordArt in MS Word, I printed his name on kraft card so that it resembled the Fender trademark.  A little distressing to darken the neck and a few highlights with a white Posco pen et voila!

I stamped these half-tone stars  (Waltzing Mouse Stamps Kaboom) in various distress colours to create a backdrop for the guitar!  I knew I wanted to use this "rockstar" sentiment from a very old Inkadinkadoo set, because he is!  As well as being a brilliant guitarist, he also sets up our mikes, handles the sound check and puts everything away afterwards!   He also set up the sound system and played at my son's 18th birthday party!  I double stamped the Rockstar (using the stamping platform) in versafine to make sure it was bold and clear!

I hope you are inspired by this month's movie and hope to see your "Stardust" inspired creations in the Gallery soon!

Thanks for stopping by, I hope you enjoyed your visit.  If you leave a comment, I’ll know you were here and how to find you and perhaps we can get better acquainted!  

Kate

Monday 5 September 2022

Poinsettia and Foiled Foliage

 It's always Anything Goes at 613 Avenue Create Challenge but this month we have the optional twist of Foliage - Leaves or Paper!   Do come and hang out on our front porch, we love to see your work!


The sponsor this month is Conie Fong Art!


 For this card I've used her Holly Poinsettia image. I coloured her with watercolour pencils with just a few highlights in red marker because I wanted a more vivid red.   I added a layered mini Poinsettia die cut (Marianne Design) to the image for some dimension and a little gold for sparkle.  


I cut a rectangle from the front panel using a double stitched frame to frame the image and the front panel is attached to the card base with foam tape.  I had this sentiment already on the stamping platform so I stamped it on a scrap of ivory cardstock and cut it with a small stitched rectangle. 


I would like to enter this card in the following challenges


Crafty Hazelnut's Christmas Challenge #610 - optional twist "S" for scarf ;


Peace on Earth Challenge #23 - inspired by the winter foliage


NBUS Challenge #42 - the poinsettia is NBUS ;


As You Like It Challenge - My favourite cardbase is A6 - just cut an A4 in half and fold in half, and no additional postage!


Time Out Challenge 221 - Festive


*****


I've been wanting to try out foiling for a while now!   Seeing this sentiment of  Conie’s - I immediately thought it would be perfect for foiling - bold with some lovely loops and curls!  And being digital I could make it as big or as small as I wanted - I went big!


Just a quick explanation of foiling for those who haven't heard of it.  You print something on your laser printer - yes it has to be a laser printer but there is no time limit so you could take your documents to Office Works or the equivalent and print them there!  Then you put it through a Minc machine or equivalent and the heat makes the foil to stick to wherever the toner is - i.e. your printed image!  Easy, peasy right!  


Well I don’t own a Minc machine, but a friend gave me a cheap knock off and I understand that a laminator will also work!  I found this video on Youtube which filled me with enough confidence to give it a go!   I ordered some Heidi Swapp foil on Amazon but it took ages to arrive.  In the meantime, I found some cheap rolls in Action and bought about 10 a few!  I have to say, I was underwhelmed - the foil stuck to everything not just what I had printed on the laser printer!  Well, I decided to take advantage of this "feature" and cut the foil the same size as my card panel and ran that through the laminator!  There was a fine gold layer over the entire panel, but I quite liked the effect and the sentiment was definitely readable!  


I also ran a die-cut leaf (CraftEmotions Fern) which had NO toner on it through the machine and achieved a lovely shimmery effect.  I took this photo in the sunshine, so you could see the mottled gold effect!


But as you can see from this photo, the leafy pattern on this background panel is still visible when the light isn't shining directly on it!


And here's a short video I took because this effect is very hard to photograph! 


The genuine Minc Foil finally arrived and I'm happy to report the problem with the background foil is gone!  I made these place cards for my friend's daughter's wedding and the gold only stuck to the printed parts - a lovely thistle image and the names!  And it made no difference with the cheap foiling machine or the laminator!  So foiling with a laminator does work!   Why not give it a try for yourself!


****

A few weeks ago I posted a card I made for a friend who joined our choir after being forced to flee from Ukraine.  She has just released a beautiful song on YouTube and though it's in Ukrainian, you can easily get the gist of the anti-war story she tells!  If you have the time, listen to it and drop her a like if you enjoy it -"Тополя"Olena Afanasyeva "Poplar"

I'm thrilled you stopped by and hope you enjoyed your visit.  If you leave a comment, I’ll know you were here and how to find you and perhaps we can get better acquainted!  

Kate