Tuesday 29 November 2022

Celtic Christmas

Challenge #129 has just gone live at The Holly and Ivy Christmas Challenge and this is my DT card! My team mates have created some wonderfully inspiring Christmas cards so be sure to pop over and check them out!


I wanted some Christmas cards with a Celtic flavour for some of my Irish friends and I thought this lovely Cheery Lynn Celtic Whimsy border die could suitably ground this Tim Holtz Woodlands Tree - a kind of Celtic snowdrift!  

The sentiment is from an old WMS set stamped with Galaxy Gold Brilliance ink.  The little birds are from an Impression Obsession die set.

I’d like to join the following challenges
Allsorts Challenge #704 - wings and tails (on my birds)
As You Like It Challenge - Favourite Non-Traditional Challenge - Birds are by far my favourite non-traditional Christmas animal
Die Traumfabrik Challenge #110 - The Santa Clause
The Sisterhood of Crafters - Anything Christmas or Winter
Scrappy Mo’s November Rudolph Days 

I'm thrilled you stopped by my little corner of blogland and hope you go away a little inspired!  If you leave a comment, I’ll know you were here and how to find you so I can see what you've been up to!!!  

Kate

Tuesday 15 November 2022

Hang Loose

 Challenge #128 has just gone live at The Holly and Ivy Christmas Challenge and here is my DT card - well actually four of them!


I bought some 12x12 paper pads last Christmas and included with them was a sheet of four 6x6 panels that had big, bold, gold-foiled sentiments.  I wasn't sure quite what to do with them for the longest time -  I felt like I was cheating if I didn't add something to them that I had actually made, but the sentiments were so large that nothing much fitted.

And then I had an idea!  This Lydia Ornament die from Spellbinders is one of my favourites - it’s ever so elegant in my opinion, small enough so as not to obscure too much of the sentiment, and if I were to  attach it with a magnet it could be easily removed, revealing the whole sentiment and making a little keepsake as well.

I didn't have quite enough to make up four ornaments in red and gold so the last was made up in red and green.  I also ran out of red ribbon!  On the backs of each of the ornaments I adhered a magnet and covered it with a small star cut from gold paper.  

The sentiment panels were cut with a stitched square die so they’d fit onto bases that fitted the square envelopes I had in my stash.   I adhered magnets to the panels such that they covered as little of the sentiments as possible and then covered these also with gold stars cut from gold paper. 

Et voila - I had four fairly quick Christmas cards with a little keepsake!  And I used up stash that I had no idea what to do with, so I was feeling pretty chuffed!


And doesn’t the little ornament look lovely in the tree! 


I’d also like to enter the following challenges
Snippets Playground #441 - I’m hoping these panels are considered “snippet” enough in any case, the gold  on the ornaments is definitely from any little snippets left from previous projects!
Die Traumfabrik Challenge #110 - Santa Clause is this month’s movie but anything Christmas will do!

I'm thrilled you stopped by my little corner of blog land and hope you go away a little inspired!  If you leave a comment, I’ll know you were here and how to find you so I can see what you've been up to!!!  

Kate

Sunday 6 November 2022

God Jul

It's time for another challenge at 613 Avenue Create!  This month, the optional twist is 

Fancy Folds and Cuts 

I've created a Flip Card.  There are dies available for this and yes I did buy them but I then realized that they're not necessary!  All you really need is a frame die which is symmetrical.  I have loads of Spellbinders Label dies which could have worked but in the end I went with a circle!

Unfortunately, I didn't take step by step photos and I don't believe in measurements so I'll just describe the basic idea behind this card - that way you can make them up in any size you like and you can make your flipping frame any shape you want!   If you have any questions, leave them in the comments box and I'll do my best to answer them.  

  1. Fold your base card in half as you would normally if the card base didn't come pre-folded;
  2. Fold one of the halves in half again so that you have a short flap - this will be the front;
  3. Choose a symmetrical frame die such that half of it will fit on this front flap;
  4. I find it useful to mark on the die where the mid point is (for the circle I cut a circle from scrap paper, folded it in half and lay the folded circle back into to the die, turned it over and marked the places at the top and bottom of the die where the fold line was);
  5. Open up your card base and lay it on your die cutting plate face up, making sure it's square with the front flap to the top 
  6. Place your frame die over the front flap so that the centre of the frame die lines up with the fold line;
  7. Place the edge of your top cutting plate so that it does NOT go past this midline;
  8. Run it though the machine.
  9. You're left with a semi circular cut-out - there's a foldline right down the middle of your circle but that's ok, you won't see this fold line once you placed a decorated circle of the same size on either side;
  10. Decorate the various panels
Here's the card in its various stages of opening


For this card I've chosen an image and sentiments from one of my favourite Christmas stamp sets - Waltzing Mouse Alpine Christmas.  I've also tried to create an Edelwyss flower using the MFT Sunflower.  I had a snippet left over of a background I had stamped previously using WMS Cabin Plaid in redand teamed it with this spotted blue DP to try for a Swiss/Nordic vibe!

I’d like to enter the following challenges

Why not give this fancy fold or another, and enter your card in the 613 Avenue Create!  Or just play along without the twist!  We love to see your creations!

I'm thrilled you stopped by and hope you enjoyed your visit.  If you leave a comment, I’ll know you were here and how to find you and perhaps we can get better acquainted!  

Kate

Tuesday 1 November 2022

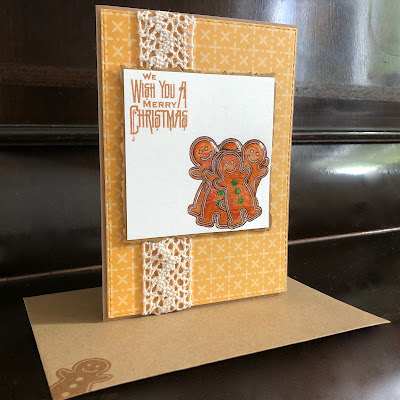
Gingerbread Wishes


The Holly and Ivy Challenge #127 has just gone live and we would love to see your Anything Christmas Goes creations.  I hope to inspire you and in turn look forward to being inspired by your Christmas creations and I know my fellow design team members feel the same way!  As we are now on the slippery slope towards Christmas, I appreciate how fortunate I am to be part of this great team and to have my Christmas cards done well beforehand so that I can enjoy this precious time with my family.

This was a difficult one for me!  Attempt after attempt ended in dead ends!  And at one stage, this one was headed for the same fate!  My gingerbreadmen were stamped and coloured with markers and Derwent inktense pencils - originally on a much larger panel but a smudge here and a dropped marker there meant I had to cut it down to size.  If I hadn't (stupidly in hindsight) coated them with glossy accents before the accidents occurred I would have had more options - I was attempting a CAS design initially!  Anyhoo, I eventually went with a very simple sketch, a piece of patterned paper, snippets of lace and Kraft and a Kraft card base.  Yes the lower left corner of the panel is a little bare and if I'd had more time, I could have fixed it but I was ever so keen to put it on the "done" pile as opposed to my ever-growing "maybe I can do something with this later" pile - it had been one of those weeks!

I'm in Australia at the moment, catching up with friends and family!  One of my aunts said something to me and I think I might adopt it as my new mantra - "It is what it is"!  There are things in life over which we have no control, it's best to accept "it is what it is" rather than fret over what might have happened had a different course of action been taken or what we believe should be.  So this card "is what it is".

I’d like to enter my card in the Snippets Challenge 440 (I think snippets of lace count in any case I also used snippets of kraft)!  I think I’ll even be complying with the optional theme of Halloween/Autumn or just their colours (as is the case with the autumnal colours in this Christmas card of mine)!

I'm thrilled you stopped by my little corner of blogland and hope you go away a little inspired!  If you leave a comment, I’ll know you were here and how to find you so I can see what you've been up to!!!  

Kate