Thursday, 21 November 2024

Mr Fabulous


Challenge #277 at Time Out Challenges has just gone live and this fortnight we have an Inspired By Words Challenge with this quote from Emma Straub

"There truly is not an occasion that is not improved by wearing something festive"


Inspired By Words challenge works exactly as you would expect - you take the words from the featured quote and use them to inspire your creation!   You can use one word, multiple words or just the general idea of the quote.

This challenge is generously being sponsored by Poppy Stamps and they are offering our Top Pick as chosen by the design teams a $20 credit to the store!  The Top Pick will also be invited to join Time Out as a guest designer in a future challenge!

Speaking of guest designers, our guest designer this fortnight is Tenia Nelson and you can check out her wonderful creations at Jazzy Paper Designs!  Be sure to check out her gorgeous interpretation of our quote as well as my talented team mates over on the Time Out Blog!

How do these words inspire you and where do they lead your imagination?  We hope you can take Time Out of your busy schedule to come play cards with us!


The word festive means of or relating to a festival and at this time of year Christmas is probably utmost in our minds!  But it also means cheerful and jovially celebratory and happily I was able to break open this NBUS and very dapper set (Tailored by Tim Holtz) to really celebrate in style!


The lapel of the tuxedo was coated in glossy accents and sprinkled with glitter for extra pizazz.   The gear was stacked a few times for stability and coated with Topiary Tapestry Embossing Powder (which has flecks of gold in it - lovely) and UTEE.  Finally I stacked a few of these "fabulous" sentiments from Honey Bee Stamps to finish off the card.


I'd like to enter the following fabulous challenges
NBUS Challenge #68 - NBUS Tailored Set from Tim Holtz;
Simon Says Wednesday Challenge is to Sparkle and Shine!

Thanks for stopping by, I hope you go away a little inspired!  Your visits and comments are always a joy and always appreciated!  And if you leave a comment, I’ll know you were here and should be able to find you!


Kate

Monday, 11 November 2024

Ruby, Ruby, Ruby, Ruby


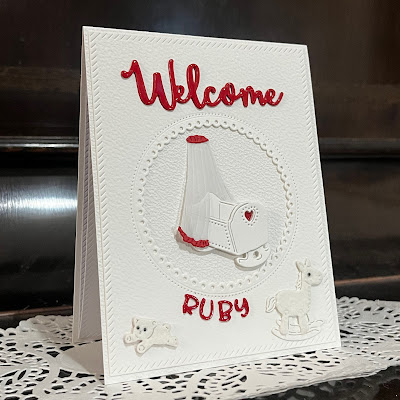
A friend of mine asked if I'd make a card for a work colleague of hers who had just had a new baby.  When she told me the baby's name was Ruby, well how could I not want to make the card in red?!   Not an easy colour for a baby card to be sure - and so I was forced to really put on my thinking cap!  

In the end, I kept the red to a minimum - basically a white on white and just a few accents of red.  My lovely Gummiapan dies (rocking horse, teddy bear and crib and curtain) came out once again along with this pretty circle aperture die from Waltzing Mouse.  

The trick with these Gummiapan dies is to "snip and layer" them (the dies have been cleverly designed to allow for easy snipping)!   For example I cut the cradle body twice and snipped off the legs and back walls of the 2nd cut and it was laid over the first.  Now the back walls of the crib and the legs sits behind - as they would IRL!   Because the effect was too subtle in white on white, I actually did the same to a third die cut.  Christine Stokes has a Youtube channel that will explain it much better than I ever could!  Then it was just a matter of placing a snippet of red card stock behind the heart cavity and filling it with glossy accents for a heart shaped ruby fit for a princess - especially one named Ruby!  

I cut the curtain from vellum and then the top and bottom frill of the curtain from red, snipped and layered it over the vellum, added my curtain to the crib and placed it over the crib then added it to my aperture with thin foam tape.   The advantage of the red bits on the curtain is that there are places to hide any adhesive - although this vellum is so thick it's barely visible anyway.  The top of the curtain is directly glued to the base and I managed to hide a tiny snippet of foam tape behind the red part of the base of the curtain to give the curtain support where it extends beyond the crib.

The teddy bear was cut from white card stock and then again from white felt - I cut a few dots from a snippet of black for the eyes.   I cut the rocking horse twice, snipped the mane, tail and around the front legs from the 2nd die cut and laid it over the first.  I then did the same again to one cut from white felt.  I used another of the black dots for the eye.

The Welcome sentiment (Lil Inker) was cut 3 times, stacked and added to the top and the name (this tiny alphabet is also from Gummiapan) was cut and stack twice.  Afterwards I decided to add glossy accents to the curtain trim, sentiment and name so they matched the ruby on the crib.

Since the Colourful Option for the month of November is red, I'd like to add my card there!

As soon as I heard the baby's name I thought of the song from the Kaiser Chiefs Ruby, hence the title of this blog post - if you're not familiar with the song check it out here (it's a favourite of my son's and mine)!  And as Fab'n'Funky Challenge #604 has the theme "music to my ears" (basically make something that's inspired by a song or song title or has a musical theme), I'd like to enter my card there! 

The theme for Inspirational Challenge #328 is layer it up and that's exactly what I had to do with this card to achieve the desired 3-D effect!

Thanks for visiting, I hope you go away a little inspired!  And if you leave a comment, I’ll know you were here and hopefully be able to find you!


Kate

Thursday, 7 November 2024

Cozy Bundled Snowman


Challenge #276 has just gone live at Time Out Challenges and this fortnight we challenge you to be

Cozy


Our generous sponsor Newton's Nook is offering a $25 store credit to our Time Out Winner as chosen by the Design Team!  And the winner will be offered a guest design spot with us in a future challenge!   


Speaking of guest designers, we are joined this challenge by the lovely Kerry Parkinson of Kerry's Papercraft our winner from Challenge #271 - wait until you see what she has created for our challenge this fortnight and do drop by and leave her some comment love!!

Personally, I think you can't go wrong with any sort of tartan but especially a buffalo plaid for cozy!  Even cosier if the panel is cut with this lovely NBUS Patchwork die from The Greetery!   And doesn't this snowman (Memory Box Tall Bundled Snowman) look cozy in his tartan scarf and beanie!   

I used foam tape between the body layers when assembling the snowman and I mounted him on a wobble spring.  The sentiment words are from an old WMS set (Sewing Box Christmas)!

I'd like to enter the following fabulous challenges
NBUS Challenge #68 - NBUS Bundled Snowman die set and Greetery Patchwork Die;
Allsorts Week #805 - Magic of the Season;
Colourful Options November 2024 - Red is the colour this month;

Thanks for stopping by, I hope you go away a little inspired!  Your comments are always appreciated and always bring me joy and if you do leave a comment, I’ll know you were here and how to find you!

Kate

Friday, 1 November 2024

Sparkles Snowflakes

Sparkles Christmas Challenge #164 has just gone live and the theme this month is

Snowflakes

I love Snowflakes and have loads of them!  However my addiction to new Christmas related stash, meant I couldn't resist this gorgeous Diamond Snowflake from Poppy Stamps on a recent spree!  

This is a two-die set and there are a lot of options but I liked it because I could finally do something I've been wanting to try for years - create a scene within a snowflake aperture - all my other snowflakes were too small or had narrow centres.


I cut into this glittered pink snowflake panel to create my aperture using the detailed overlay die from the set.    I then added a white frame using the second die in the set.  The left over bits of the snowflakes weren't wasted as you will see shortly!  Underneath I placed a scene I had stamped using Waltzing Mouse Stamps Alpine Village.  The Alpine Christmas set has some lovely sentiments but stamping wasn't an option on this glittered panel so I went with a die cut sentiment instead (another recently acquired and NBUS set - Avery Elle Let it Snow) cut from pink foil.  There wasn't really enough room on the panel for this large sentiment but I managed to squeeze it in by placing it at a jaunty angle.

Twofer

I assembled a snowflake from the bits left over from my first card and made that the focal element of my second card - a spinner card!  Even though it was the second design, I actually finished it first because I had to wait for that sentiment die to arrive before I could finish the first card whereas I could stamp on this panel!  Once I stamped this simple sentiment (also from WMS Alpine Christmas) to the base of the panel, I cut a track for the spinning snowflake and mounted the panel with a double stack of foam tape.  I filled in the rest of the panel with pink snowflakes cut from snippets of pink that were lying around on my work area from previous projects.  I couldn't resist adding more sparkle with these clear water droplet gems - this card is definitely being hand-delivered!

And here it is action!


My team mates at the Sparkle Christmas Challenge have some wonderful Snowflake inspiration for you as well as all our participants in the gallery so be sure to call by there as well!  

I'd like to enter the following wonderful challenges

NBUS Challenge #68 - the snowflake die is NBUS;
Hand Stamped Sentiments Challenge #450 - For my 2nd Card, love that pink snowflake in the  inspiration pic;
Festive Friday Challenge - Themes of Christmas and Snowflakes;
Merry Little Christmas Challenge #59 - Anything Christmas Goes;


Thanks for visiting, I hope you go away a little inspired!  And if you leave a comment, I’ll know you were here and how to find you!


Kate