Showing posts with label Young at Heart. Show all posts

Thursday, 8 May 2025

Spaced Out


May the 4th has been declared Star Wars Day for several years now so for Time Out Challenge #288, we challenge you to get your space jam on and create something inspired by the night sky!


Our challenge is sponsored by Top Flight Stamps who have very generously donated a $25 store credit to be awarded to our top pick as voted by the Design Team.  Our winner will also be invited to guest design with us in a future challenge.  Speaking of guest designers, we are joined this challenge by Jaydee our winner of Challenge 283!  Please do drop by and see what she has made especially for our challenge and if you didn't come from the Challenge Blog, drop by there as well and see how the rest of the team were inspired!

I'd like to enter in the following fabulous challenges
Snippets Playground Challenge #505 - various snippets of silver (including the liner from a margarine pack);


NBUS Challenge #74 - NBUS Infunly Astronaut set;
Allsorts Challenge #822 - Inspired by a song - Fly me to the Moon;
A Cut Above May Challenge - Anything Goes with Die Cuts;

Thanks for stopping by, I hope you go away a little inspired!  Your visits and comments are always a joy and always appreciated!  And if you leave a comment, I’ll know you were here and should be able to find you!


Kate

Thursday, 28 March 2024

My Little Unicorn


Challenge #260 has just gone live at  Time Out Challenges and this fortnight we challenge you to be 

Striped!


This challenge is generously being sponsored by Lawn Fawn and they are offering our Top Pick as chosen by the design teams a $25 credit to their store!  The Top Pick will also be invited to join Time Out as a guest designer in a future challenge!


Speaking of guest designers, we are joined this challenge by Karen our winner of Challenge 256!  If you're still stuck for ideas, Karen and the rest of the team have plenty of inspiration for you over on the Challenge Blog!

I cut a background panel from some candy stripe patterned paper, then cut an aperture using a WMS Pretty Circles die - which is exactly what I needed to provide a pretty focal space for my little unicorn scene and plenty of room for the stamped sentiment. 

I wanted to create a few of these unicorns for future projects (they're so darned cute) so I created a jig and cut some unicorns and fairies with Lawn Fawn A Little Sparkle Lawn Cuts from white card stock.  I then placed my jig in my stamping platform and aligned the matching stamps perfectly and stamped all the blanks I'd cut. 

I coloured the fairies' dresses and the unicorns mane, tail and hooves with some alcohol markers.  Then added a little sparkle with some glossy accents and glitter!


I stamped the sentiment from the set on the panel with black Memento ink and then again with Versamark (what would I do without a stamping platform) and embossed with a holographic embossing powder.

I wanted my aperture to be recessed, so I laid foam tape strips around the aperture and around the edges and a few other strategic places.  Then I cut some puffy clouds (Lawn Fawn Puffy Clouds Border) from some pink vellum and laid these across the base of the aperture so that they would be flat on the card base. Not sure why, but at the time I felt the sky should to be blue so I laid a circle of blue just large enough to cover the aperture and then attached the panel to the card base.  

Then I mounted my unicorn on a wobble spring and placed him on top of the clouds (which is why the clouds needed to be flat against the base) and placed the fairies around him.  Here he is in action


I'd like to enter My Little Unicorn into the following fabulous challenges
Cut It Up Challenge #300 - Happy Birthday;

Thanks for stopping by, I hope you go away a little inspired!  Your comments are always appreciated and always bring me joy and if you do leave a comment, I’ll know you were here and how to find you!

Kate

Monday, 20 March 2023

On Track for a Twofer

Onefer :

I may have already mentioned we have been fortunate to have several Ukrainian women join our choir and I am blessed to call these women friends.  One of them has a young son and he loves cars!  When I found out he was having a birthday, I knew I wanted to make him a card with a moving car.  This Beetle from Taylored Expressions is probably my favourite vehicle - I love the little details it has!  I've used MFT Open Road to cut the little piece of road and channel and MFT Rolling Hills to create the ... rolling hills!  

His mother helped me with the "Happy Birthday Ilias" text in Ukrainian which I printed onto some white card stock and cut with one of the Memory Box Marshamallow Clouds.   I added a little sun so that it's peeking out from behind the cloud (Frantic Stamper Village Sky set) and added a little aeroplane from the same set to complete the scene.  I don't think cars should spin so I added two magnets to the back (side by side) so the car slides back and forth.

He loved it!
 

I'd like to enter this card in the Daring Cardmakers Challenge with the prompt Little Ones

Twofer:

While I had the Open Road and Rolling Hills sets out, I thought I'd use them to create a scene for this little hedgehog - I made it for a project a few days ago but ended up not using it!  I wanted the hedgehog to roll up and down the hill so I used the curved track piece from the Open Road set and tried to match the curvature to that of the rolling hillside.  I added this stacked "sending" sentiment (Simon Says Stamp) and a little cloud and sun (from Frantic Stamper Village Sky).  As I was cutting some of these little flowers for the meadow one of them fell on the Hedgehog and I quite liked the of a flower behind her ear!  I am just totally in love with these Whittle animals from Poppy Stamps - they have such amazing details!  I've coloured this little hedgehog with light and dark brown alcohol markers.  The little eyes and prickles have caught more of the ink and so are highlighted - love the effect!  


I also bought the matching Whittle Wild Animals Sentiment Stamp Set so you can probably guess what's on the inside of the card .....


Yup!  I'm sending hedge-hugs!


I almost forgot to include a video!

This little hedgehog is making his debut here so I'll be entering it in NBUS Challenge #48

Thanks for stopping by, I hope you go away a little inspired!  Your visits and comments are always a joy and always appreciated!  And if you leave a comment, I’ll know you were here and how to find you!

Kate

Sunday, 4 December 2022

Fly Me to the Moon

It's time for another challenge at 613 Avenue CreateThis month, the optional twist is 

Up In The Sky 

so we'd like to see the Sun, the Moon, Stars, Sleighs, Angels, Clouds, etc.!   But it's only optional and we do love to see your projects!


I've gone with a rocket ship blasting off for the moon - it was actually a special request for an astrophysicist from his wife for his birthday but it could easily work for an anniversary or other significant celebration!

I have a stamp of a rocket in an old WMS set (Lil' Heroes) but the rocket image was too juvenile for him but I did use one of the sentiments from the set.  Plus, she really wanted an interactive card so I really needed to go the die route ... which I don't have so I needed to hit the Silhouette Store and see what they had available and create one digitally.

Here's a closeup of my little rocket.  Some of the pieces were tiny - the whole rocket is less than 2" long!  Anyway I managed to put them all together without losing any pieces and with a coat or two (or three) of glossy accents it was ready for blast off!


And here's a short video of the rocket in motion - flying between the earth and the moon!


I'm thrilled you stopped by my little corner of blogland and hope you go away a little inspired!  If you leave a comment, I’ll know you were here and how to find you so I can see what you've been up to!!!  

Kate

Sunday, 13 March 2022

Twofer Cupcake and Ice Cream


I am holding a card workshop in just over 2 months and I wanted to cover shaker cards.  Normally I would just create a window panel on the front, foam tape on the back etc., BUT I bought a die a few several months ago which meant making shaker cards a little differently!  It's not a fancy brand, I found it at the local Action store - a Dutch chain store which sells loads of things cheaply but I spend most of my time (and money) in the craft section!  It's a little simplistic but cleverly designed to create either a cupcake, an ice cream or a cloud!  

I cut 4 of the "frames" from pink card stock plus the solid die from acetate and stacked these up (one above the acetate window pane and 3 below) - this card stock is pretty thick so that was enough.  Filled it from the back and added a solid die cut from patterned paper to close off the element and voila!  

I then chose to make up a cupcake card.  I added a scalloped border cut from striped paper to the top so it resembles a shop awning.  I stamped the word Cupcakes (Verve) - I should really have embossed it so it was a little more noticeable (and will when I make it up for the card workshop)!  I made a counter top from the same striped DP, added a doily and finished off the cupcake with a birthday candle!  That Cupcake embossing folder was a freebie from a magazine but I'm rather hazy on that as I didn't keep the packaging!

After cutting 4 frames I had 4 inner die cuts left over so I decided to layer these up and create a scoop of Strawberry Sorbet atop the cone die which came with the set.  The embossing folder is from Cuttlebug. After fiddling with various sentiments, I decided to just go with the word "Sweet"!  


I'm entering my cards in the Make My Monday Challenge #169 - Food and Drink which closes in a few hours so I had better get my skates on!

I'd also like to enter Just Us Girls Challenge #623 - both cards use embossing folders

Since this die is NBUS, I'd also like to enter NUS Challenge #36 and thank Darnell and the team for encouraging us to actually use the stash we buy!

I'd also like to enter Papercraft Challenges Challenge  #79 - Anything Goes

Thanks for stopping by, I hope you enjoyed your visit.  If you leave a comment, I’ll be thrilled!  I’ll also know you were here and check out what you’ve been up to so we can get better acquainted!

Kate

Tuesday, 19 November 2013

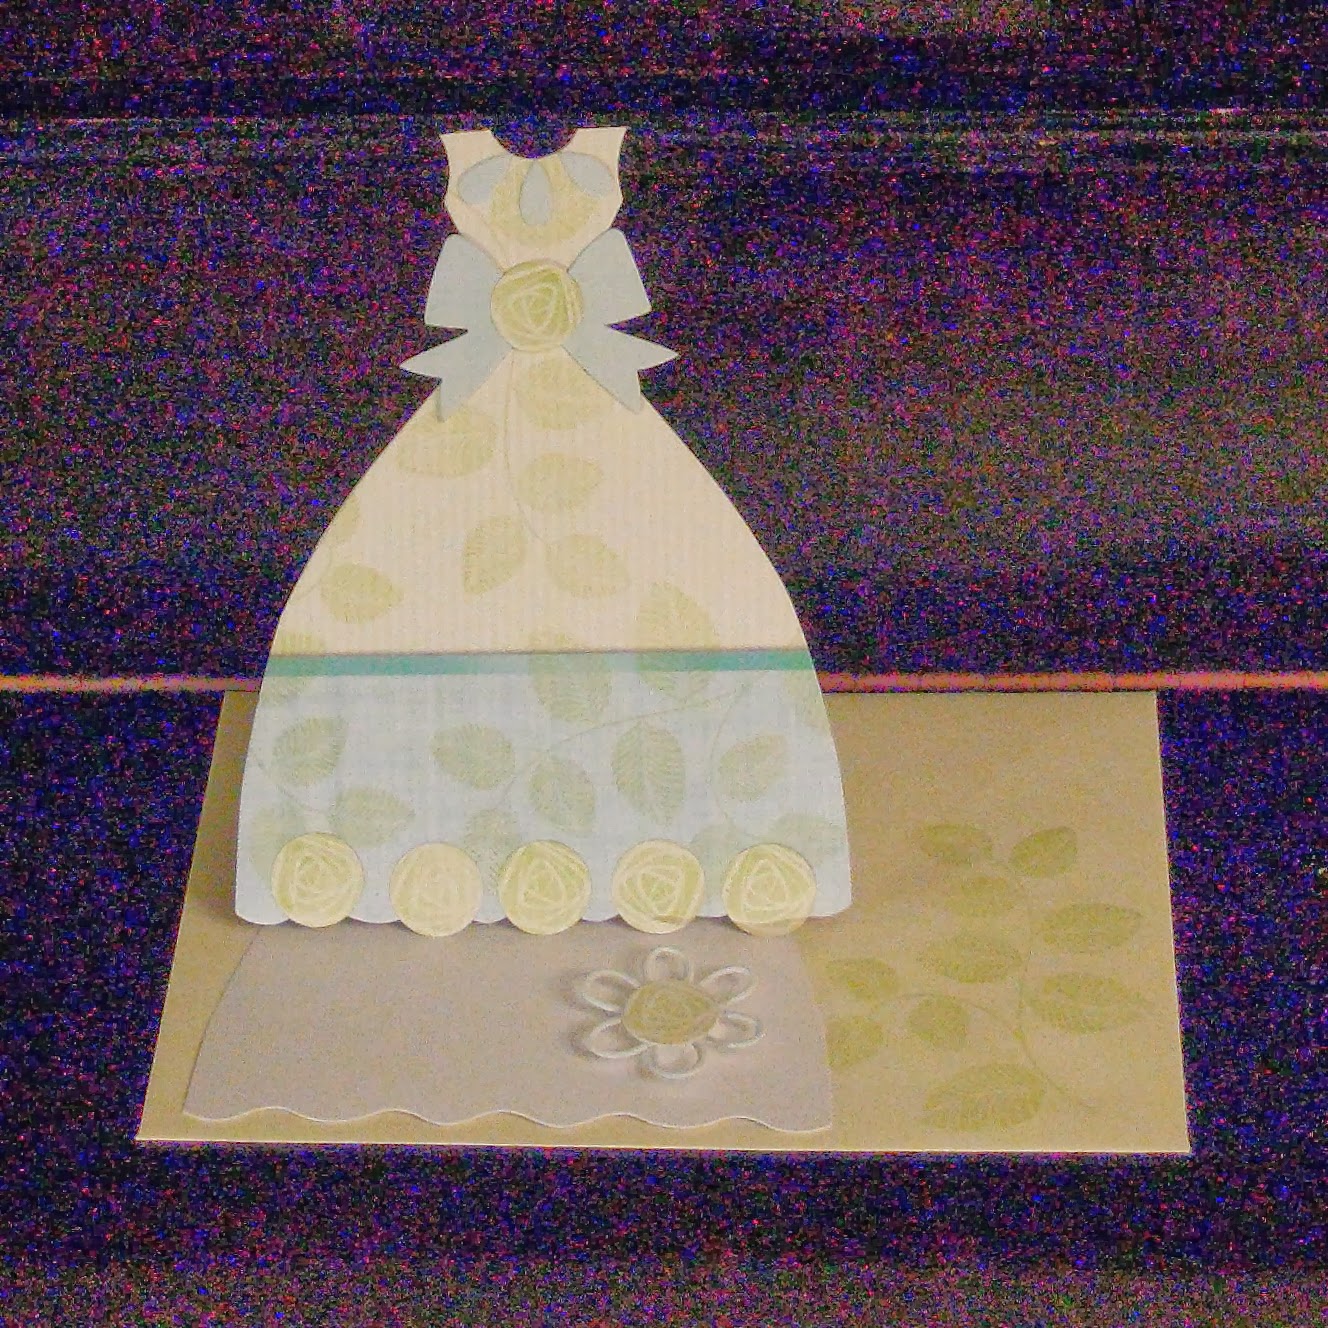
Easel Does It !!!


I absolutely love the level of detail in this Simple Sprig set from WMS.  What I love most about the set is that the flowers have been cleverly designed so they can be punched out with a circular punch, or cut with a Spellbinders Circle.


I had cut this card using the Sizzix XL Princess Dress and Deckled Card die, carefully lining up the DP paper so as to make the best use of the patterned paper.  I overstamped the DP with the simple sprig with Versamagic Tea Leaves and stamped and cut several roses to form a border on the dress, decorate the bow and as a top layer on the easel stopper.  The bottom layer of the stopper was cut using a Cuttlebug die.  The "necklace" was made from pieces cut out from this flower.  The beautify bow comes with the die.

Such a pretty die, and the cards are a doddle to make and decorate. I made three of these cards for birthday cards for some of Simon's friends - including two Monster High themed ones now which i unfortunately didn't get around to taking photos of.  This more elegant one is being donated to the local Christmas market.  I've left off any sentiment, partly because of the language, and partly because it's more versatile - it could be a birthday card, a graduation card or just to let some special woman in your life know you care - leastways that's the spiel I'll be using to sell them.  Wish me luck !!!

Sunday, 11 March 2012

I do like to be beside the Seaside

I made this "card" for Simon's friend Charlotte who turned 7 this week and had a pirate themed party.

I wanted to have a cavity for the treasure chest, and I had been wondering for some time how to construct something from card when I happened across this paper mache box, which seemed like a suitable alternative.
The box was gessoed and painted with a cream acrylic.  I then stamped several shell images onto white tissue paper using Archival ink and adhered these with a glue varnish from Decopatch.   As you can see in the 2nd photo there is a treasure chest shape cut from the top so the cavity was visible when the skull was removed.

I've always had a passion for stamps of shells and other sea related images, which has not been diminished by living in a wet, cold, land-locked European country for over 14 years now (I've now started collecting die cuts as well).  The shell corner stamp is one of the 1st stamps I ever bought - about 16 years ago, an old wood mounted rubber one from a company called Stamp World (made in Australia, doubt it's still available).  Other stamps which I used as fillers were from a Crafty Individuals Crafty Elements set.


The topper was cut using Sizzix Original "Skull and Crossbones".  The negative was cut from mount-board (it needs to be quite thick in order for the skull to sit in it firmly) which had an alcohol-inked surface - I think I used Sandal, Salmon and Latte inks as well as Gold.  The skull was cut from a double layer of foam board with a piece of black sandwiched in between so the eyes weren't hollow.

Inside the box were 9 little compartments.  The middle one visible when the skull was removed had a die cut treasure chest in the bottom - cut from brown and cream coredinations card using a Quickutz die.  The others had stamped shell images from the Crafty Individuals set, and all were sprinkled with mult-coloured glitter (to represent sparkling jewels).  To finish it off I wrote and printed a small rhyme and aged it using distress inks and tearing the edges.   The font used was Treasure Map Deadhand.